|
Do the deadlift’s benefits outweigh its risks? Some people say that unless you’re a competitive strength athlete, the answer is no because the chances of getting seriously hurt are too high and the injuries are too severe. They’ll also often claim the deadlift wears your nervous system to a frazzle and is far harder to recover from than many other exercises, making it impractical. Lastly, they’ll usually add, the deadlift isn’t necessary for getting fit and strong and can be easily replaced with safer exercises that train all of the same muscles. I mostly disagree. Here’s my position: 1. When performed correctly, the deadlift is safe for most of us. The operative phrases here are “when performed correctly” and “for most of us.” That is, when us everyday gymgoers use proper form, the deadlift isn’t dangerous, even as the weights get heavy (for us). Many competitive strength athletes, however, prime themselves for injury in a few ways, including performance-enhancing drugs and extreme training protocols, and for these people, deadlifting can become far riskier what with their extraordinary loads, training volumes, and performative feats. 2. While even an intense deadlift session is difficult, it doesn’t produce a meaningful amount of CNS (central nervous system) fatigue. In one study, for example, 30 minutes after doing 8 sets of 2 reps of deadlifts at 95% of one-rep max, resistance-trained men only experienced a 5-to-10% reduction in CNS output. At bottom, CNS fatigue is a real phenomenon that can impair muscular performance, but it’s also a nonentity for us recreational weightlifters. 3. The deadlift isn’t essential for building a great physique, but it does train nearly every muscle in your body, making it highly efficient. Think of how many isolation exercises are needed to train all of the muscles it directly and indirectly trains (calves, hamstrings, glutes, paraspinals, upper-back muscles, quads, etc.). So, if you’re a natural weightlifter with enough discipline to learn and use good form and enough patience to expect and accept plodding progress, you have nothing to fear from the deadlift. And if you’d like to take the first step down this path, here are a few articles to get you off on the right foot:
The post Is Deadlifting Worth the Risk? appeared first on Legion Athletics. from https://legionathletics.com/deadlifting-worth-it/
0 Comments
Using body fat calipers involves pinching and measuring specific “sites” on your body, then using equations or a body fat calipers calculator to arrive at an estimate of your body fat percentage. How accurate your results are depend on how well you take your measurements and which method of measuring body fat with calipers you use. In this article you’ll learn everything you need to know about how to use calipers to measure body fat accurately, including how to do the most common body fat calipers tests such as the 3-, 4-, and 7-site Jackson-Pollock skinfold methods, the Parrillo skinfold method, the Durnin/Womersley skinfold method, and the Navy tape measure method.
What Are Skinfold Calipers?Skinfold calipers (or “body fat calipers”) are devices used to measure your body fat percentage (a caliper is any device that measures the dimensions of an object). To estimate your body fat percentage with skinfold calipers, you measure the thickness of the skin and fat underneath (subcutaneous fat) on particular points of your body. You then plug these measurements into a mathematical formula that uses them to estimate what your body fat percentage is. Want a free custom meal planning tool?Quickly calculate your calories, macros, and even micros for losing fat and building muscle. 
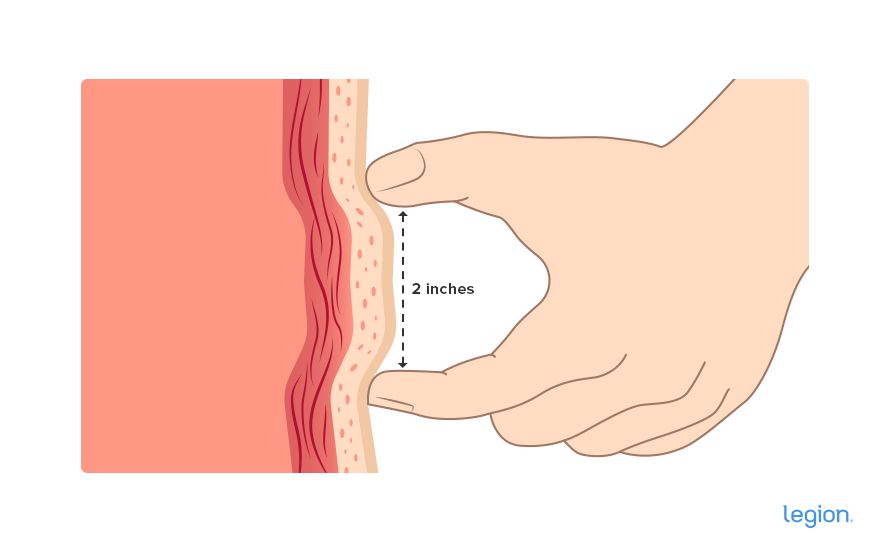
Are Skinfold Calipers Accurate?For people who have average or above-average amounts of body fat (15% and higher for men, or 25% and higher for women), body fat calipers are a fairly accurate way to measure body fat percentage. In leaner people, however (less than 15% for men or 25% for women), body fat calipers tend to underestimate body fat percentage, with the results becoming more skewed the leaner you get. For example, if you’re a man around 8 or 9% body fat, skinfold calipers will likely give you a reading closer to 5%. And if you’re a woman around 19 to 20% body fat, you could get a reading closer to 12 or 14%. This isn’t to say that body fat calipers aren’t useful if you’re lean. You just have to look at them as a tool for measuring trends rather than as a precise method of estimating your body fat percentage. That is, although calipers might not accurately estimate your body composition, they can reliably tell you if you’re losing fat (your measurements will shrink), gaining fat (your measurements will rise), or maintaining the same body fat percentage (the measurements will stay the same). Remember, too, that accurately measuring your body fat percentage isn’t necessary or even all that useful for getting into great shape. Although using a particular body fat percentage as a benchmark for progress can be motivating (e.g. “I want to get down to 20% body fat”), what matters most is that you’re happy with what you see in the mirror. Provided you are, your precise body fat percentage is irrelevant. How to Measure Body Fat with CalipersWhen you take your body fat caliper measurements, follow these steps: 1. Pinch your skin by placing the thumb and forefinger on your body about two inches apart, firmly pushing them into your flesh like this:
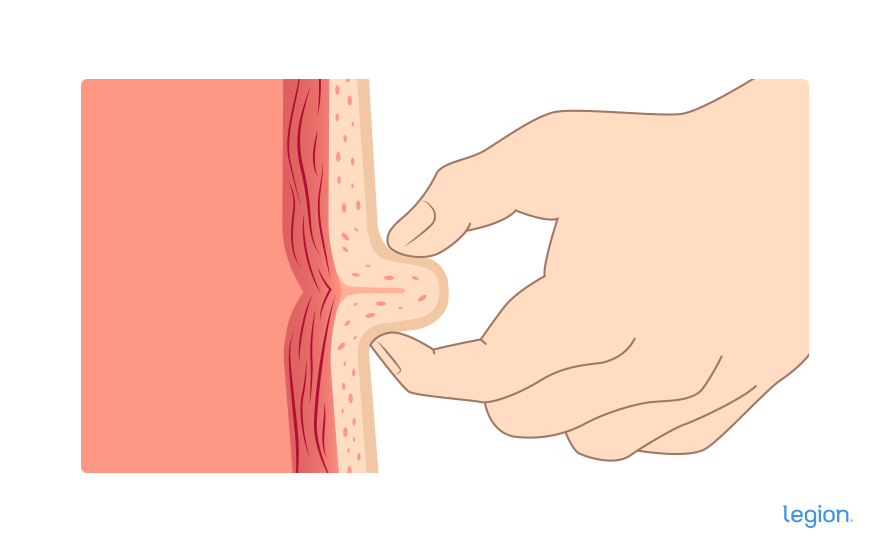
(Note: If there’s a lot of fat in the area, you may need to increase the distance between your thumb and forefinger to grasp and pull the skinfold). 2. Push your fingers together, then gently pull the skinfold away from your body, like this:
3. Measure a pinched skinfold by placing the tips of the caliper in the middle of and perpendicular to it about an inch to the side of where your fingers are touching your skin, compress the caliper until it clicks (and no more), and note the measurement, like this:
5 Tips for Measuring Body Fat With Calipers AccuratelyLearning how to measure body fat with calipers takes practice, so here are five tips to help you get more accurate readings.
The Skinfold Sites and How to Measure Them
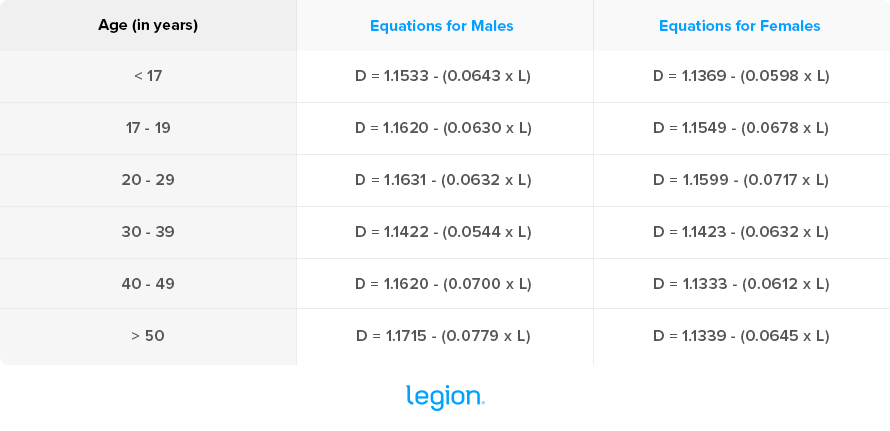
Now let’s look at the most common methods of measuring body fat with calipers and which parts of your body you need to measure for each. You can find all of the equations you need to calculate your body fat percentage below. Be warned: Some of them are knotty, so it’s best to have a graphing calculator on hand if you want to tackle them yourself. An easier solution is to plug your measurements into the calculator below, and it’ll do all the number crunching for you: The Legion Body Fat Percentage Calculator 3-site Jackson-Pollock Skinfold MethodThe 3-site Jackson-Pollock skinfold formula is one of the most commonly used because it’s easy, quick, and reliable. That said, it tends to underestimate the body fat percentage of people who are fairly lean (men under 15% body fat and women under 25%). Thus, it’s best used for people with more body fat than this. If you’re a woman, take a triceps, thigh, and suprailiac measurement (in millimeters), then use the following equations to calculate your body fat percentage: Body Density = 1.0994921 – (0.0009929 x sum of skinfolds) + (0.0000023 x square of the sum of skinfolds) – (0.0001392 x age) Body Fat Percentage = (495 / Body Density) – 450 If you’re a man, take a pectoral, abdominal, and thigh measurement (in millimeters), then use the following equations to calculate your body fat percentage: Body Density = 1.10938 – (0.0008267 x sum of skinfolds) + (0.0000016 x square of the sum of skinfolds) – (0.0002574 x age) Body Fat Percentage = (495 / Body Density) – 450 4-site Jackson-Pollock Skinfold MethodThe 4-site Jackson-Pollock skinfold formula is about as accurate as the 3-site formula, but also tends to slightly underestimate the body fat percentage of people who are fairly lean. Thus, it’s best used for people with more body fat than this. If you’re a woman, take a triceps, thigh, suprailiac, and abdominal measurement (in millimeters), then use the following equations to calculate your body fat percentage: Body Density = (0.29669 x sum of skinfolds) – (0.00043 x square of the sum of skinfolds) + (0.02963 x age) + 1.4072 Body Fat Percentage = (495 / Body Density) – 450 If you’re a man, take a thigh, triceps, suprailiac, and abdominal measurement (in millimeters), then use the following equations to calculate your body fat percentage: Body Density = (0.29288 x sum of skinfolds) – (0.0005 x square of the sum of skinfolds) + (0.15845 x age) – 5.76377 Body Fat Percentage = (495 / Body Density) – 450 7-site Jackson-Pollock Skinfold MethodThe 7-site Jackson-Pollock skinfold formula is no more accurate than the 3-site formula, is more of a hassle, and also tends to slightly underestimate the body fat percentage of people who are fairly lean. Thus, it’s normally better to use the 3-site method. For the 7-site body fat calipers test, men and women take the same measurements but use different equations to calculate their body fat percentage. If you’re a woman, take a pectoral, abdominal, thigh, triceps, subscapular, suprailiac, and midaxillary measurement (in millimeters), then use the following equations to calculate your body fat percentage: Body Density = 1.097 – (0.00046971 x sum of skinfolds) + (0.00000056 x square of the sum of skinfold sites) – (0.00012828 x age) Body Fat Percentage = (495 / Body Density) – 450 If you’re a man, take a pectoral, abdominal, thigh, triceps, subscapular, suprailiac, and midaxillary measurement (in millimeters), then use the following equations to calculate your body fat percentage: Body Density = 1.112 – (0.00043499 x sum of skinfolds) + (0.00000055 x square of the sum of skinfold sites) – (0.00028826 x age) Body Fat Percentage = (495 / Body Density) – 450 9-site Parrillo Skinfold MethodThe 9-site Parrillo skinfold formula isn’t very well studied, and thus it’s hard to say how accurate it is compared to the other formulas. Thus, I recommend you use a more established method such as the 3-site Jackson-Pollock skinfold formula or the Navy tape measure method. For the 9-site body fat calipers test, men and women take the same measurements and use the same equations to calculate their body fat percentage. Whether you’re a man or a woman, take a pectoral, abdominal, thigh, biceps, triceps, subscapular, suprailiac, lower back, and calf measurement (in millimeters), then use the following equation to calculate your body fat percentage: Body Fat Percentage = (27 x sum of skinfolds sites) divided by bodyweight (lb.). 4-site Durnin/Womersley Skinfold MethodThe 4-site Durnin/Womersley skinfold formula can produce accurate results for some people. However, most people find it overestimates body fat percentage. Thus, I recommend you use a more accurate method such as the 3-site Jackson-Pollock skinfold formula of the Navy tape measure method. For the 4-site body fat calipers test, men and women take the same measurements (in millimeters) but use different equations to calculate their body fat percentage depending on their age. (Note: In the following equations, D = Body Density and L = Log of the sum of skinfolds.)
Body Fat Percentage = (495 / Body Density) – 450 The Navy Tape Measure MethodThe Navy tape measure method doesn’t use body fat calipers, but it’s still worth a mention here because it’s a simple, fast, and reliable way to measure your body fat percentage. Although this method is fairly accurate, it also tends to overestimate the body fat percentage of people who are fairly lean. Thus, it’s best used for men over 15% body fat and women over 25%. Here are the measurements you need to take for the Navy tape measure method, and how to take them accurately:
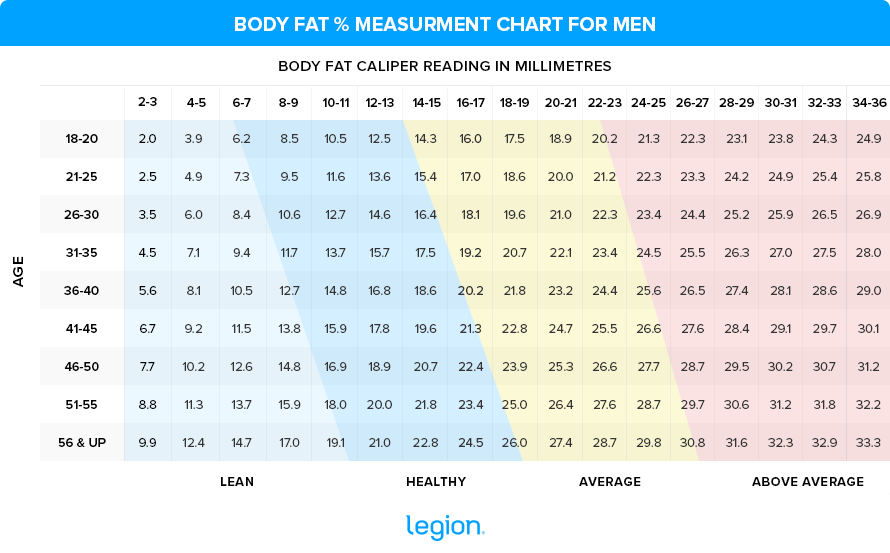
If you’re a woman, take a height, neck, waist, and hips measurement (in inches), then use the following equations to calculate your body fat percentage (you’ll want to use a graphing calculator for this one): Body Fat Percentage = 163.205 x log10 (waist + hip – neck) – 97.684 x log10 (height) – 78.387 If you’re a man, take a height, neck, and waist measurement (in inches), then use the following equations to calculate your body fat percentage: Body Fat Percentage = 86.010 x log10 (abdomen – neck) – 70.041 x log10 (height) + 36.76 Or, just select the Navy Tape Measure Method when using The Legion Body Fat Percentage Calculator. FAQ #1: What are the best body fat calipers?Personally, I like the Accu-Measure body fat calipers because they’re easy to use, accurate, and affordable (which is probably why they’re endorsed by the World Natural Bodybuilding Federation as the premiere body fat caliper on the market). FAQ #2: Where should I buy body fat calipers?You can buy body fat calipers online, from sporting goods stores, and even from some grocery stores. While none of these options are inherently better than the others, you tend to find online stores like Amazon have a wider range of products available at slightly lower prices (the Accu-Measure body fat calipers only cost $15, though, so I recommend you go with those). FAQ #3: How accurate are body fat calipers?So long as your body fat percentage is higher than 15% (men) or 25% (women), body fat calipers are reasonably accurate. If your body fat percentage is below 15% (men) or 25% (women), however, body fat calipers tend to underestimate body fat percentage. Regardless of your body fat percentage, if skinfold measurements aren’t taken properly, they’re likely to produce inaccurate results. FAQ #4: How do I use a body fat calipers chart?A body fat calipers chart works in a very similar way to a body fat calipers calculator: it helps you calculate your estimated body fat percentage without having to do any of the arithmetic yourself. To use most body fat calipers charts, you take measurements (usually three or four depending on the calipers and chart you use), add the readings together, then refer to the right chart for your age and sex (there are different charts for adults and children, and males and females) to find your estimated body fat percentage. This normally requires you to find the sum of your caliper measurements on one axis, your age on the other, and then trace your fingers to the point at which those two lines intersect on the chart. Before body fat calipers calculators were readily available online, using a body fat calipers chart was the least effortful way to calculate your body fat percentage based on your caliper measurements. Now, however, body fat calipers calculators make the process even simpler, which is why they tend to be the preferred method of calculating body fat percentage based on caliper measurements. That said, there are some charts that enable you to estimate your body fat percentage based on a single caliper measurement. These charts are still useful because they make estimating your body fat percentage quick and easy. The only downside is that they tend to be less accurate than other methods, so they should only ever be used to get a ballpark estimate of body fat percentage rather than a precise measurement. Here’s a single-site body fat calipers chart for men:
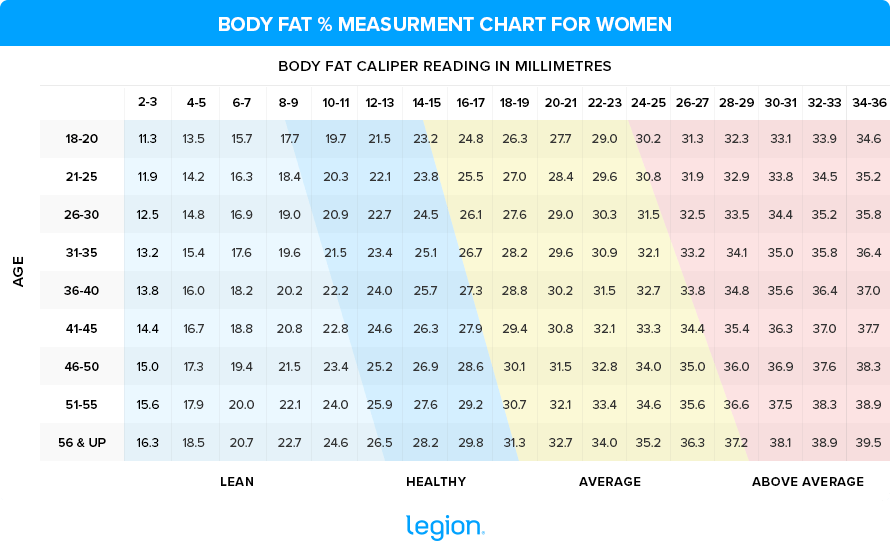
And here’s one for women:
To use these body fat calipers charts, follow these steps:
For example, if your suprailiac measurement from step one is 14.5 millimeters and you’re 38 years old, your estimated body fat percentage would be 18.6%. Note: If your measurement is over 36 mm, add 0.25% for every millimeter pinched above 36 mm. FAQ #5: Are digital body fat calipers more accurate than manual body fat calipers?No. Digital body fat calipers and manual body fat calipers are equally accurate as long as you use them correctly. The benefits of digital body fat calipers are that they tend to be easier to read and they can quickly convert imperial measurements to metric (and vice versa). The downside is that they’re normally more expensive than manual calipers. FAQ #6: Where can I find a good body fat calipers calculator?Instead of using formulas to translate your body fat calipers measurements into an estimated body fat percentage, you can plug your numbers into a body fat calipers calculator (or “body fat percentage calculator”), and it will do all the math for you. You can find a body fat percentage calculator that uses your gender, weight, age, and preferred body fat calipers measurement method to estimate your body fat percentage here: The Legion Body Fat Percentage Calculator The post How to Use Skinfold Calipers to Measure Body Fat Percentage appeared first on Legion Athletics. from https://legionathletics.com/body-fat-calipers/
Mark Rippetoe is my most-requested repeat guest on the podcast, and he’s back for another installment. So, what are we getting into this time? In this episode, we’re having a meandering discussion about the state of all things Covid. Now, if you know Mark, you know that he likes to say “prickly” things, so you know it will be an interesting chat. Mark and I have fun chatting about masks, vaccines, boosters, lockdowns, Covidian cultists, and all the rest of it. Listen to this episode and let me know what you think! Lastly, if you want to support the show, please drop a quick review of it over on iTunes. It really helps! Mentioned on the Show:What did you think of this episode? Have anything else to share? Let me know in the comments below!The post Ep. #822: Mark Rippetoe on Covidians, Vaccines, Lockdowns, and More appeared first on Legion Athletics. from https://legionathletics.com/muscle-for-life-episode-822-mark-rippetoe-interview/ The post How Nikita Used Bigger Leaner Stronger to Lose 15 Pounds in 3 Months appeared first on Legion Athletics. from https://legionathletics.com/legion-success-nikita-b/ Getting toned, lean, and strong doesn’t revolve around dubious “biohacks” for supercharging muscle growth, melting belly fat, or optimizing hormones. It doesn’t require dietary strategies like intermittent fasting and keto, exercise techniques like muscle confusion and functional training, or esoteric pills and powders like collagen protein and exogenous ketones. Instead, the real “secret sauce” of the fitness elite can be summed up like this:
In other words, the passport to the body you’ve always wanted is in the fundamentals, not the fringes. The devil’s in the details, however, because there are a few correct and many incorrect ways of executing those strategies. It’s like making music—just knowing that the process amounts to using notes to create pleasing harmonies, melodies, and rhythms isn’t enough to create an earworm. You need to understand how to craft and combine those elements in very particular ways. Skeptical? You should be. I was when I first encountered the scientific research and practical strategies I share in my new book Muscle for Life. Take heart, though, because I’m also not going to ask you to make a big leap of faith. Most of what you’ll learn has been around for decades and stood the test of time, but as you’re probably not an elite athlete with access to world-class trainers and dietitians, nobody has connected the dots for you the way I do in the book. Moreover, Muscle for Life is all about getting results, and fast. That means you’ll see real, tangible improvements in your body within the first thirty days of starting this program, and within three months, your friends and family will want to know what the heck you’re doing. Your weight will be moving in the right direction, your clothes will fit better, and you’ll see muscle definition where there was little before. I promise. Want to see for yourself? Click here and pre-order your copy now: The post The Real “Secret Sauce” of the Fitness Elite appeared first on Legion Athletics. from https://legionathletics.com/secret-sauce/ This podcast is a Q&A, but it’s a bit different from the kind you’ll typically find here on Muscle For Life. In my usual Q&A episodes, I take a question from email or Instagram and then fully answer it in an episode of the podcast every week. However, over on Instagram, I’ve started doing weekly Q&As in the stories, and it occurred to me that many podcast listeners might enjoy hearing these questions and my short answers. So, instead of talking about one thing in an episode, I’m going to cover a variety of questions. And keep in mind some of these questions are just for fun. So if you want to ask me questions in my Instagram stories, follow me on Instagram (@muscleforlifefitness), and if I answer your question there, it might just make it onto an episode of the podcast! If you like this type of episode, let me know. Send me an email ([email protected]) or direct message me on Instagram. And if you don’t like it, let me know that too or how you think it could be better.
Lastly, if you want to support the show, please drop a quick review of it over on iTunes. It really helps! Timestamps:
Mentioned on the Show:Legion VIP One-on-One Coaching What did you think of this episode? Have anything else to share? Let me know in the comments below!The post Ep. #821: Q&A: Gains After 35, Counting Steps, Favorite Cheat Meal, and More appeared first on Legion Athletics. from https://legionathletics.com/muscle-for-life-episode-821-instagram-qa/ Most people don’t give much thought to their calf workouts, if they do them at all. This is a mistake. Doing a few dedicated calf exercises each week will not only add mass to your lower legs, it’ll help you jump higher and further, sprint faster, improve your squat and deadlift strength, and (probably) lower your risk of knee injuries in a range of sports. What are the best calf exercises for mass and strength, you wonder? And how should you organize them into the best calf workouts? Are there any tricks or techniques you can use to help your calves grow? Keep reading, and you’ll learn the answers to all of these questions and more. You’ll learn the anatomy of the calves, the best ways to get them to grow, and the best calf exercises and workouts you can do.
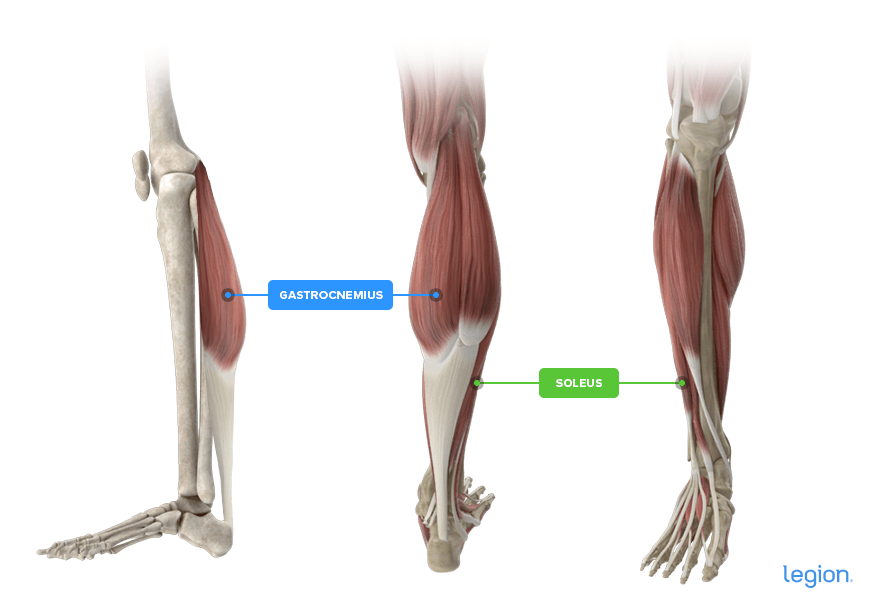
The Anatomy of the CalvesThe calves are made up of two powerful muscles:
This is the muscle you see when you look at your calf. It’s made up of two “heads”: a medial (“inside”) head, and a lateral, (“outside”) head.
This is a deep muscle that lies underneath the gastrocnemius. The soleus is actually slightly larger than the gastrocnemius by volume, which means it contributes to your calves’ overall size more than most people realize. Here’s how they look:
Both muscles work together to flex the ankle (point your toes), but they also differ in an important way. The soleus is attached to the ankle and the back of the shin bones, whereas the gastrocnemius is attached to your ankle and your thigh bone, which means it also plays a role in knee flexion (bending your knee). We don’t need to get into the technical details of what this means, other than to say that when you bend your knees, you reduce the tension on your gastrocnemius muscle and increase the tension on the soleus muscle, and the opposite occurs when you straighten your knees. This means that the gastrocnemius can’t fully contract when you do exercises like the seated calf raise or deadlift, and thus it isn’t trained as effectively by these exercises. Thus, whenever you do calf exercises with straight knees, the gastrocnemius is more involved than the soleus, and whenever you do calf exercises with bent knees, the opposite is true. The bottom line is that if you want to maximize your calf muscles’ size and strength, you should do calf exercises with your knees bent and straight. Want a free custom meal planning tool?Quickly calculate your calories, macros, and even micros for losing fat and building muscle.
The Best Calf WorkoutHere’s a short and sweet calf workout you can put into practice right away:
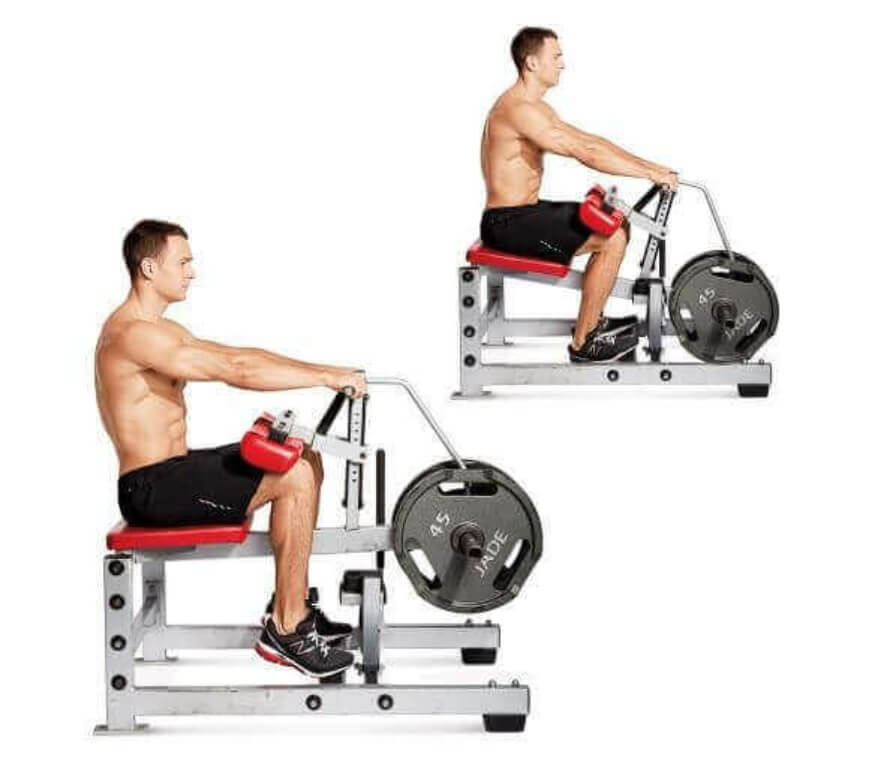
For example, let’s say you choose the leg press calf raise and the seated calf raise machine as your first two calf exercises. At the end of your Tuesday pull workout, you’d do 3 sets of 6-to-8 reps on the leg press calf raise, then 3 sets of 10-to-12 reps on the seated calf raise machine. At the end of your legs workout on Thursday, you’d repeat the same calf workout you did on Tuesday: 3 sets of 6-to-8 reps on the leg press calf raise, then 3 sets of 10-to-12 reps on the seated calf raise machine. Use double progression to add reps and then weight in every workout for 8-to-12 weeks, then take a deload week, swap your previous calf exercises for two different exercises from the list below, and repeat the process for another 8-to-12 weeks. The Best Calf Exercises for Mass1. Seated Calf Raise Machine
The seated calf raise machine trains your entire calf but emphasizes your soleus. As you learned a moment ago, the soleus contributes more than the gastrocnemius to the overall size of your calves, which makes the seated calf raise machine one of the best calf exercises for mass.
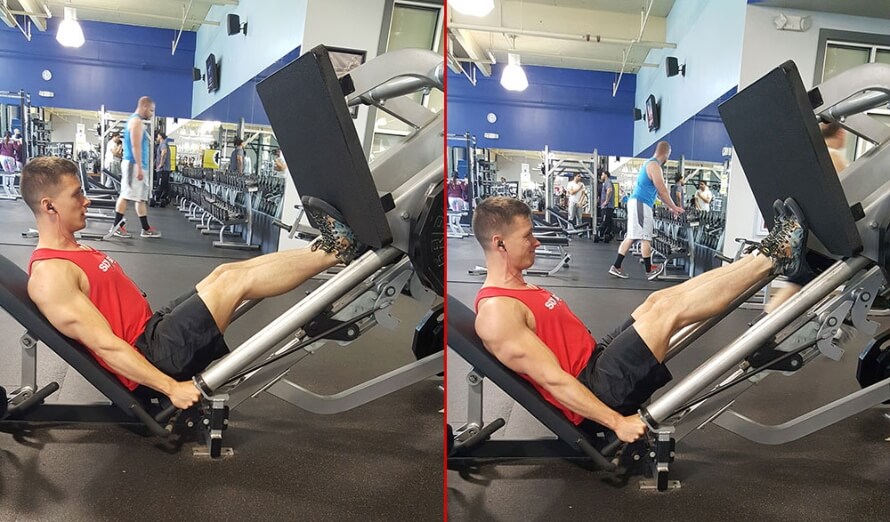
Reps: 10-to-12 Sets: 3 Rest: 2-to-3 min 2. Leg Press Calf Raise
The leg press calf raise is easy to set up and load with heavy weights, which makes it ideal for building size and strength in your calves.
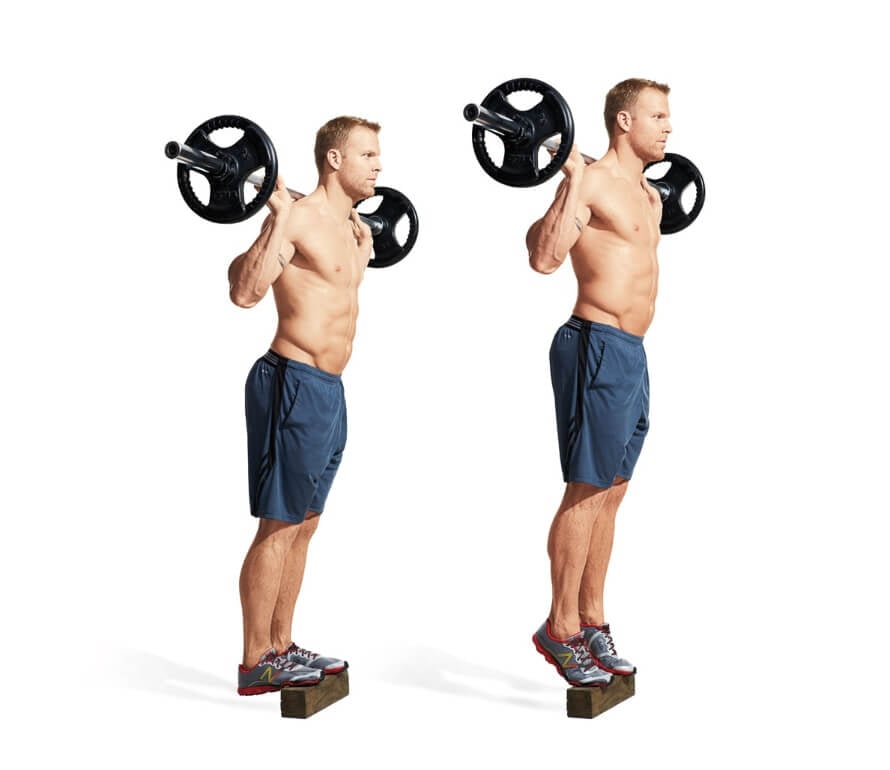
Reps: 6-to-8 Sets: 3 Rest: 2-to-3 min 3. Standing Barbell Calf Raise
The standing barbell calf raise is a good calf exercise for when you have limited equipment. However, it requires a lot of balance and coordination, so it’s best to use lighter weights and higher reps.
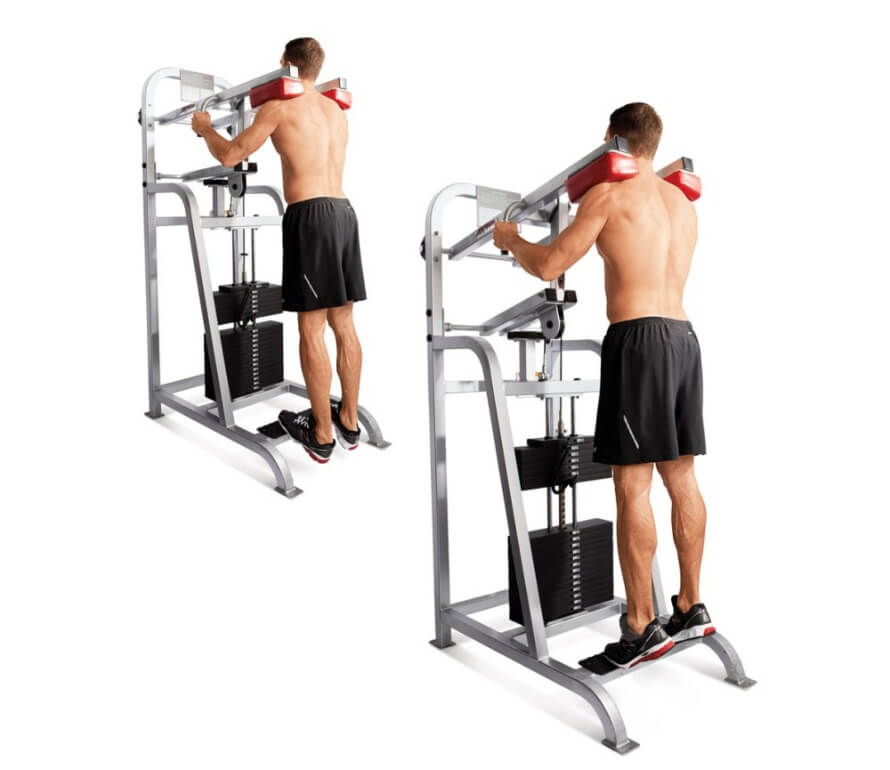
Reps: 15-to-20 Sets: 3 Rest: 2-to-3 min 4. Standing Calf Raise Machine
The standing calf raise machine trains your entire calf muscles. Because you perform it with straight legs, though, it emphasizes your gastrocnemius, which means it’s particularly good for developing the shape and appearance of your calves.
Reps: 10-to-12 Sets: 3 Rest: 2-to-3 min 5. Standing Dumbbell Single-leg Calf Raise
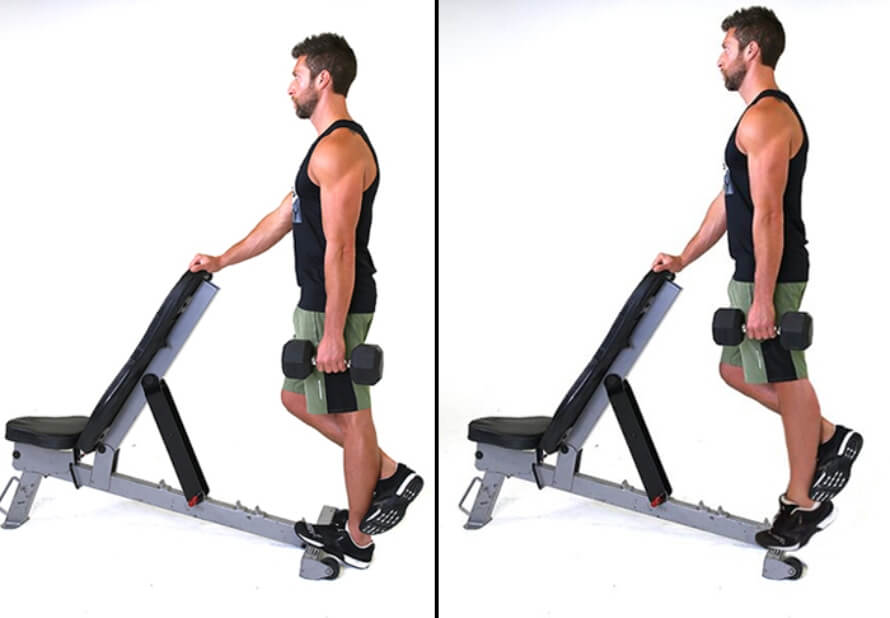
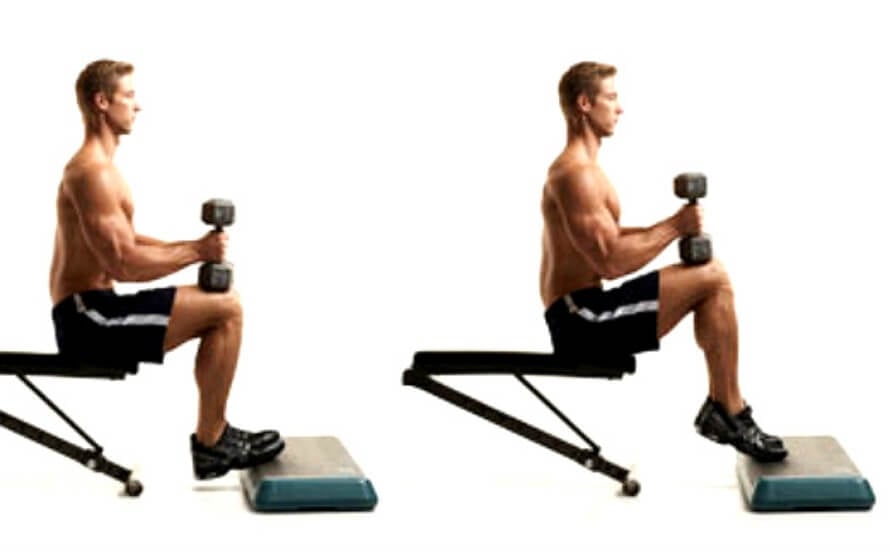
Because the standing dumbbell single-leg calf raise trains just one leg at a time, it’s useful for identifying and evening out any muscle or strength imbalances you might have. However, because it requires more balance and coordination than other calf exercises, it’s best to use lighter weights and work in a higher rep range.
Reps: 12-to-15 Sets: 3 Rest: 2-to-3 min 6. Seated Dumbbell Calf Raise
The seated dumbbell calf raise is a great way to emphasize your soleus if you have limited equipment available. However, because it can be awkward and uncomfortable to hold heavy weights on your thighs, it’s normally best to use slightly lighter weights and work in a higher rep range.
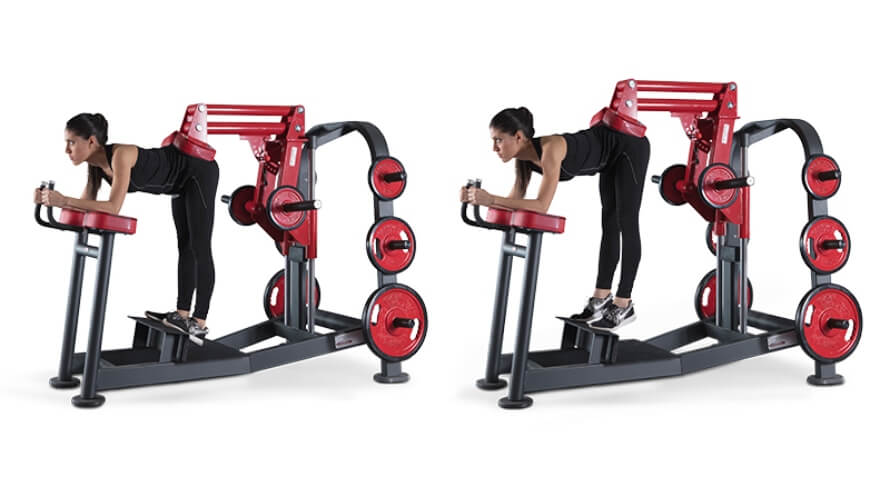
Reps: 15-to-20 Sets: 3 Rest: 2-to-3 min 7. Donkey Calf Raise
By bending over at the hips you maximally lengthen all of the muscles in the back of your legs, and research shows that training a muscle when it’s in a stretched position like this may lead to more muscle growth.
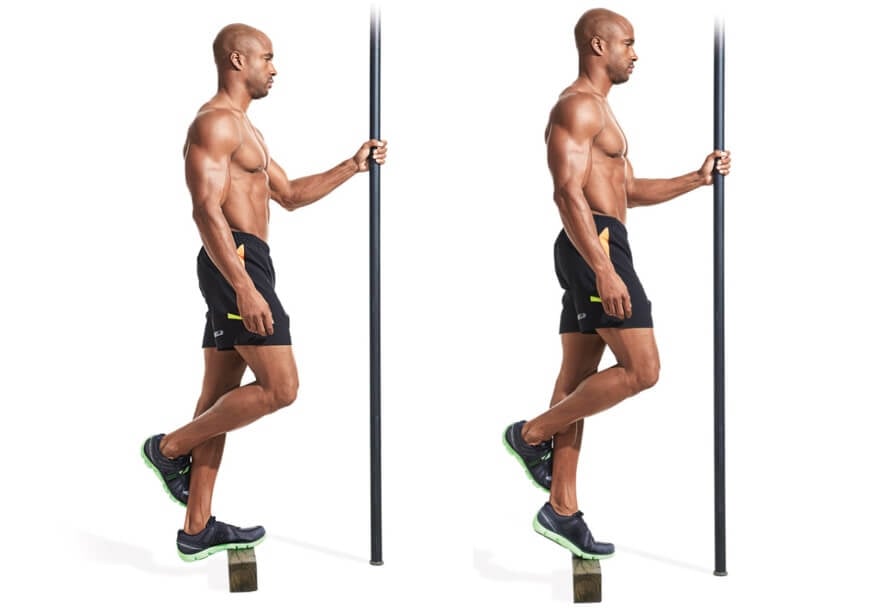
Reps: 10-to-12 Sets: 3 Rest: 2-to-3 min 8. Bodyweight Single-Leg Calf Raise
Bodyweight single-leg calf raises are a good option for people who are new to weightlifting, or if you have no equipment available. Because there’s no external weight involved, it’s best to use a high rep range and short rest periods and try to take each set close to muscular failure
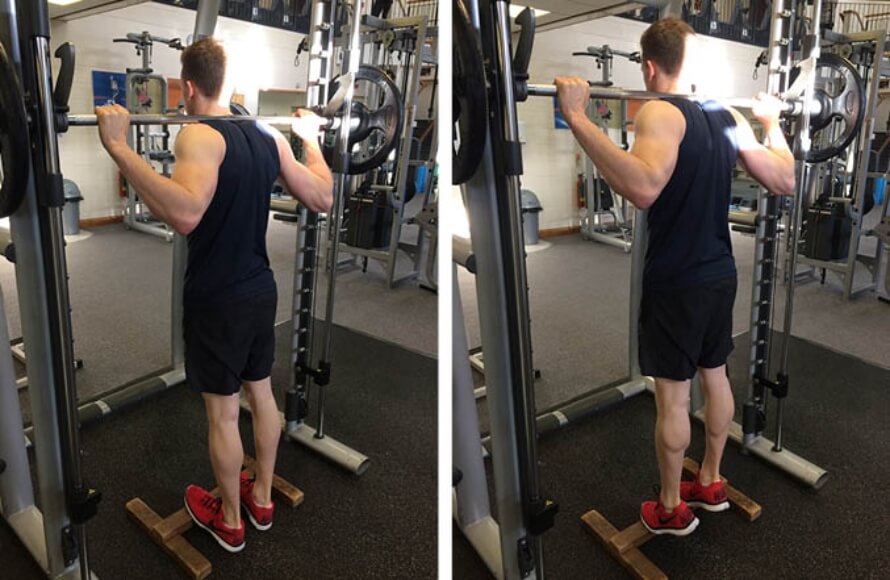
Reps: 10-to-30 Sets: 3 Rest: 1-to-2 min 9. Smith Machine Calf Raise
The Smith machine calf raise trains your calves in a similar way to the standing barbell calf raise. Since the bar on the Smith machine can only move up and down, though, it doesn’t require as much balance, which allows you to lift more weight and progress faster.
Reps: 10-to-12 Sets: 3 Rest: 2-to-3 min 10. Farmer’s Walk
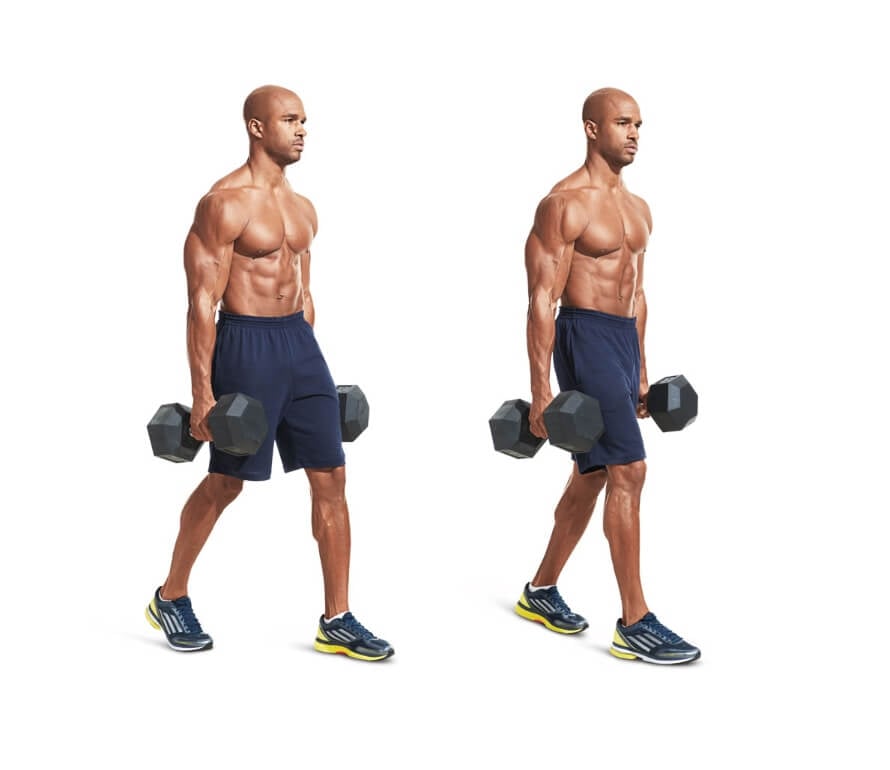
Although walking might not seem like a good calf exercise, when you carry heavy weights in each hand, your calves have to work very hard to propel your body forward.
Reps: As many steps as possible Sets: 3 Rest: 2-to-3 min FAQ #1: What’s the best calf workout for mass?The best calf workouts for mass include . . .
For example:
FAQ #2: I have bad “calf genetics.” Can I still build big calves?Many people give up on calf training because they believe that their calves’ ability to grow is mostly based on their genetics. Specifically, they think that if their calf muscles are predominantly made up of . . .
However, recent research conducted by scientists at CUNY Lehman College suggests this probably isn’t the case. In this study, the researchers found that the calves respond about as well as any other muscle in the body to resistance training regardless of their fiber-type composition. That being said, there were large differences in how participants responded to the different rep ranges used in the study (which may explain why some people struggle more than others to grow their calves). They found that for some people, high-rep training led to more growth, whereas for others low-rep training was better, and for the rest it didn’t seem to matter. In other words, if you find your calves aren’t growing, it’s probably not because you have poor calf genetics. Instead, it’s more likely that you just aren’t giving your calves the kind of training they need to grow, and that you can kickstart your calf growth by experimenting with different rep ranges. For example, if you normally train your calves with heavy weights in low rep ranges and haven’t seen much progress, switch to training with lighter weights in higher rep ranges and see if your calves respond better. Or if you normally train in high rep ranges with lighter weights, it might be time to give heavy, low-rep training a try. FAQ #3: What are the best supplements to build big calves?Unfortunately, no amount of pills and powders are going to automagically give you big calves. In fact, most muscle-building supplements are completely worthless. But here’s the good news: If you know how to eat and train to build muscle, certain supplements can speed up the process. (And if you’d like to know exactly what supplements to take to reach your fitness goals, take the Legion Supplement Finder Quiz.) Here are the best supplements for supporting your calf workouts:
FAQ #4: Are calf workouts for men and women the same?Yes. There’s nothing physiologically different about men and women’s calves, so both can benefit from the same style of calf training. FAQ #5: Can you train calves every day?You can if you want. Doing too much volume every day can quickly lead to overreaching and injury, though, so if you do decide to train your calves every day, make sure you scale down the number of sets and reps you do. If you want to train your calves every day, I recommend doing just 3 sets per workout, and if your feet, knees, or Achilles tendons begin to complain, dial your training back a bit. The post Calf Workouts: Best Calf Exercises for Mass appeared first on Legion Athletics. from https://legionathletics.com/calf-exercises/ Before we get into how to get skinny quick, there’s something you need to understand: There are many ways to “get skinny,” but most won’t leave you looking the way you want. That’s because the majority of the advice you find online about how to get skinny really fast will leave you looking “skinny fat”—and that’s probably not what you’re gunning for. Most people want to be lean but not skinny, toned and not flabby, and strong and not . . . well . . . weak. However, getting a body like this requires a slightly different approach to weight loss than “get skinny by any means necessary.” In this article you’ll learn everything you need to know about how to get skinny fast without sacrificing health, muscle, happiness, or sanity in the process.
How to Get Skinny FastThere are many tactics you can use to trim your midsection and get skinny arms, legs, and so forth, but the 10 most important pivots are as follows:
And really, the first three points are the straws that stir the drink. If you get those right, you’ll get skinny (and build muscle) without a hitch. Do the other seven tactics too, and you’ll get there faster and more enjoyably. 1. Maintain an aggressive calorie deficit.Studies show that the only way to lose fat is to eat fewer calories than you burn. The reason you’re carrying excess body fat is, over time, you consistently ate more calories than you burned. And the only way to get rid of that excess fat is to do the opposite: eat less than you burn. When you do this, you’re in a “calorie deficit” because your energy intake is less than your body needs (what’s referred to as a negative energy balance). It must get that additional energy from somewhere, and so it taps into its own fat stores. The larger your calorie deficit, the faster you’ll lose weight, but if you make it too large (by eating too little), you can shoot yourself in the foot by priming yourself for muscle loss and binge eating. We want to avoid that, but we also want to push the needle as much as we can to lose fat as fast as possible. This is why I recommend that you set your calorie deficit at 20-to-25% (eat 20-to-25% fewer calories than you burn every day). This is enough to lose fat lickety-split without losing muscle or wrestling with excessive hunger, lethargy, and the other hobgoblins of low-calorie dieting. 2. Do heavy resistance training.Lifting weights doesn’t just help you hold onto muscle while you’re dieting—it helps you lose fat, too. If you want to maximize the fat-burning effects of weightlifting . . .
And if you want to minimize muscle gain while still using resistance training to gain strength and lose fat, doing heavy, low-rep compound weightlifting is a good option. Research shows that you can maintain (but not necessarily gain) muscle and maintain or gain strength by doing just one short weightlifting session per week. The benefit of this is you can stay healthy and strong and boost fat loss while staying lithe and skinny. Here’s an example workout you can use to maintain muscle and strength training only once per week:
3. Eat plenty of protein.When we’re talking about body composition, protein is by far the most important macronutrient. Studies show that eating adequate protein helps you . . .
The bottom line is high-protein dieting beats low-protein in every way, especially when you’re trying to get skinny. Specifically, you should eat about 1-to-1.2 grams per pound of body weight per day. And if you’re very overweight (25%+ body fat in men and 30%+ in women), you can reduce this to around 40% of your total calories per day. 4. Plan your meals.It’s estimated that we make around 35,000 decisions per day. As the day wears on, and the number of decisions we make mounts, we begin to suffer from decision fatigue—the impaired ability to make decisions that are rational, pragmatic, and prudent. That’s why it can be difficult to make healthy dinner choices after a long day at work, and why you often find yourself ordering take-out pizza rather than cooking the salmon you had waiting in your fridge. The easiest way to get around this is to take all the thinking out of it, and plan your meals ahead of time. This way you’ll never have to spend time deciding how to prepare your meals when you’re tired, and you’ll always have healthy, nutritious food to hand that helps you reach your weight-loss goals. 5. Eat a lot of fruits and vegetables.Including fruits and vegetables with every meal helps you get skinny quickly because they’re low in calories and fat, which means you can fill up on large portions without overshooting your calorie target. Some good vegetable options include:
And some good fruit options include:
6. Track your progress.Tracking your progress is one of the best ways to keep yourself motivated to lose weight for two reasons:
If you want to be successful with your weight loss goals, you need to track . . .
And if you want additional motivation and data to quantify your results, you should also measure . . .
(Check out this article if you’d like to learn more about tracking changes in your body composition). 7. Limit liquid calories.Alcoholic drinks, sugary sodas, and fruit juices don’t offer much in the way of nutrition and can increase your calorie intake by several hundred calories per day. Likewise, cutting these out of your diet can also decrease your calorie intake by hundreds of calories per day and cause rapid weight loss. That’s why they’re best avoided when you’re trying to get skinny fast. You don’t necessarily have to swear them off entirely (a few tablespoons of cream in your coffee or a glass of low-calorie fruit juice are fine from time to time), but these should be some of the first things to cut from your diet if you find you aren’t losing weight as fast as you’d like. 8. Do some cardio.The best way to include cardio in a weight loss regimen is to do as little as needed to reach your desired rate of weight loss and stay fit, and no more. For best results . . .
9. Get enough sleep.Research shows that people who don’t get enough high-quality sleep while dieting lose less fat than those who do. What’s more, studies show that getting enough sleep helps your body burn fat instead of muscle, and makes you feel less hungry while in a calorie deficit, which means you’re less likely to overeat. So, the takeaway here is simple: if you want to get skinny as fast as possible, you need to sleep enough, and that means getting seven-to-nine hours of shut-eye every night. 10. Take the right supplements.Unfortunately, no amount of pills and powders are going to help you get skinny overnight. In fact, most fat-loss supplements are completely worthless. But here’s the good news: If you know how to diet to lose weight fast—following the steps in this article—certain supplements can help. (And if you’d like to know exactly what supplements to take to reach your fitness goals, take the Legion Supplement Finder Quiz.) Here are the best supplements to get skinny fast:
Want a free custom meal planning tool?Quickly calculate your calories, macros, and even micros for losing fat and building muscle.
FAQ #1: How do you get skinny legs?Many guides on how to get skinny legs or how to get skinny thighs fast recommend you eat “special” foods and do specific leg exercises to lose fat on your legs. However, this is a fallacy—you can’t “spot reduce” fat. That is, there’s no such thing as a diet or exercise plan that will target leg fat specifically. What you can do, though, is reduce your overall body fat percentage, which will also reduce the amount of fat covering your legs. And the best way to do this is to combine the advice in this article with a large helping of patience. In fact, that latter point is really the key—instead of focusing on getting skinny legs fast, focus on sticking firmly to the plan, and let your body transform in its own time. As long as you’re losing fat and looking better every week, you’re on the right track, and there’s no reason to rush things. The good news is that women—who are predisposed to storing a disproportionately large amount of their total body fat on their legs--tend to lose fat from their thighs before they lose it from other parts of their body. And men tend not to store much fat on their legs at all, so they’re less likely to have an issue with getting rid of leg fat specifically. FAQ #2: How do you get skinny arms?Many guides on how to get skinny arms recommend you eat “special” foods and do specific biceps and triceps exercises to lose fat on your arms. As with getting skinny legs, though, you can’t “spot reduce” arm fat. Instead, the solution is the same—reduce your body fat percentage, and your arms will get skinny automatically. And once again, the best way to do this is to follow the advice in this article for several weeks or months, or as long as it takes to get your arms to the size and definition you want. The good news is that your arms normally only store a lot of fat when your body fat percentage is high. As such, these areas are the first to get leaner when your body fat percentage starts to decrease. In other words, if you follow the steps in this article, your arms will get skinny fast. FAQ #3: How do you get skinny in a week?You can’t. A safe, healthy, and realistic goal is to lose 0.5-to-1% of your body weight per week, which is around 1-to-2 pounds of weight loss per week for most people. If you push the envelope and try to lose weight significantly faster than this, you’ll run head first into the many problems associated with “starvation dieting” like fluctuating hormone levels, fatigue, irritation and depression, compromised immunity and others. That said, the more fat you have to lose, the faster you can safely and healthily lose it. People who are very overweight (men over 25% body fat and women over 35%) can often lose 2-to-4 pounds per week without issue. Either way, seven days isn’t enough time for you to “get skinny.” A more sensible approach is to allow yourself at least three months to reach your goal weight or size. This is enough time to lose at least 12-to-24 pounds for most people, which should have a significant impact on how you look. FAQ #4: How do you get skinny overnight?Again, you can’t. Of course, that doesn’t stop people trying. The most common ways people try to “get skinny overnight” are to not eat, not drink, and do cardio. And while they’ll sometimes look a little leaner the next morning, this is due to a loss of water weight, not true fat loss. The reality is that even if you don’t eat for an entire day, you aren’t going to lose enough fat to see a significant change in your appearance. What you will probably experience, though, is . . .
Thus, it’s better to give yourself more time to get skinny. Fools rush in where angels fear to tread, after all. The post How to Get Skinny Fast appeared first on Legion Athletics. from https://legionathletics.com/how-to-get-skinny-fast/ In this podcast, I chat with my friend, Michael Chernow, about his new oatmeal and apparel business called Kreatures of Habit. In case you’re not familiar with Michael, he’s a trained chef and “serial entrepreneur” with repeat success in the restaurant industry, including The Meatball Shop (with 8 locations) and Seamore’s (a sustainable seafood restaurant). It’s clear Michael hasn’t just “gotten lucky,” but knows how to build effective brands and businesses, and I’ve had him on the podcast before to talk about entrepreneurship. And that’s why I wanted to get him back on the show to talk about this new endeavor. A direct-to-consumer oatmeal business is a horse of a different color from a restaurant, so I wanted to ask Michael how things are going and what inspired him to delve outside of his usual realm of restaurant entrepreneurship. In our discussion, we discuss the backstory of Kreatures of Habit, the importance and life-changing benefits of habits in general, money and financial freedom, the challenges he’s been facing with the new business, and a lot more. So if you want to learn all about the entrepreneurship process and what it’s like to start a new business that makes delicious oatmeal, listen to this interview! Lastly, if you want to support the show, please drop a quick review of it over on iTunes. It really helps! Timestamps:
Mentioned on the Show:Legion VIP One-on-One Coaching What did you think of this episode? Have anything else to share? Let me know in the comments below!The post Ep. #820: Michael Chernow on Becoming a “Kreature” of Habit appeared first on Legion Athletics. from https://legionathletics.com/muscle-for-life-episode-820-michael-chernow-interview/ The rack pull is an often undervalued exercise because it basically looks like a less-effective deadlift. In reality, though, it’s a fantastic exercise for developing your back muscles and gaining strength, and when used properly, the rack pull can help you break through plateaus in your conventional deadlifting. What’s more, the rack pull puts less stress on your lower back and hips than the conventional deadlift, which makes it ideal for people who are training around an injury or who want to keep pulling (in a new training block, for example) but with less strain on their joints. So, if you want to learn how to use rack pulls for back training, this is the article for you.
What Are Rack Pulls?The rack pull works the same way as the conventional deadlift, except you begin with the bar resting on the safety arms of a squat rack at about knee height. With the rack pull, you’re just doing the top half of a conventional deadlift—pulling the bar from roughly knee height until you’re standing upright (a position known as “lockout”). Rack Pulls vs. DeadliftsBecause the bar starts from an elevated position, rack pulls have a considerably shorter range of motion than the conventional deadlift. This means two things:
Thus, you can use rack pulls in a couple of ways:
Want a free custom meal planning tool?Quickly calculate your calories, macros, and even micros for losing fat and building muscle.
Rack Pulls: Benefits1. Rack pulls increase back size and strength.There are two main reasons people use rack pulls for back training:
2. Rack pulls improve your deadlift performance.Rack pulls improve your deadlift performance in three ways:
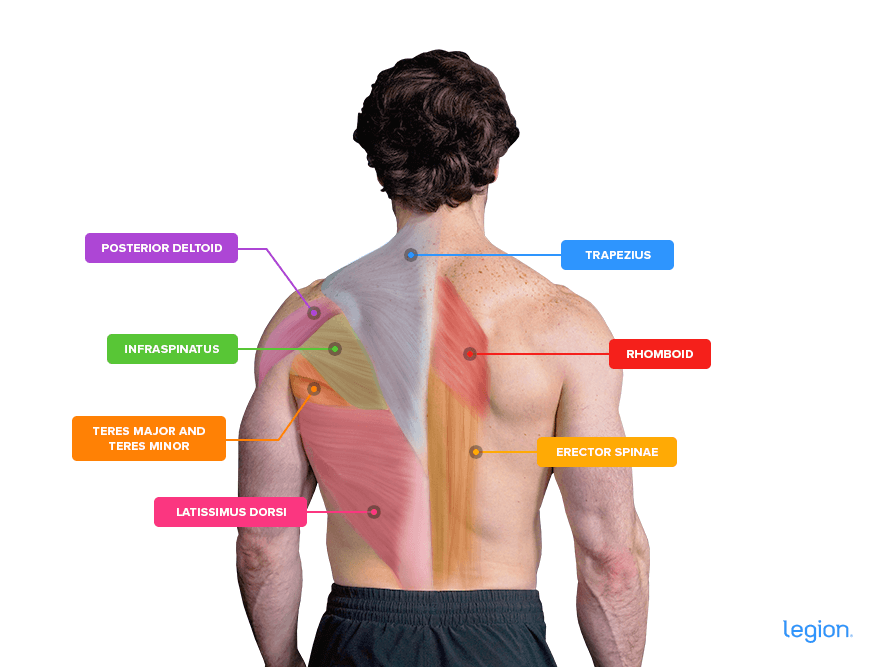
Because of these factors, thinking in terms of “rack pulls vs deadlifts” is wrongheaded. Instead, think of rack pulls as supplementary to your conventional deadlifting. 3. Rack pulls put less stress on your lower back.Because you start from a more upright position in the rack pull than you do in the deadlift, you place less stress on your lower back. This is useful for people who want to get the benefits of deadlifts (and their many variations), but who are training around or trying to avoid reaggravating a back injury Rack Pulls: Muscles WorkedBecause rack pulls look so simple and undemanding compared to the traditional deadlift, many people wonder, “what do rack pulls work?” The answer is straightforward: every muscle in your back. Specifically, the muscles worked by rack pulls are the . . .
. . . and they also train your core, glutes, and hamstrings to a smaller degree, too. Here’s how the main muscles worked by rack pulls look on your body:
Rack Pulls: FormThe best way to learn how to do rack pulls is to break the exercise into three parts: set up, pull, and descend. Step 1: Set upSet the safety arms or pins in a squat rack to knee height or slightly lower (normally about 12-to-18 inches off the floor) and place a barbell on the pins. Load the barbell with plates, then position your feet so they’re a bit less than shoulder-width apart with your toes pointed slightly out, and the barbell is directly over your midfoot. (Use the same stance you would with the conventional deadlift). Bend over and grab the bar with a double-overhand grip (both palms facing toward your body) just outside your shins. Take a deep breath of air into your belly (as opposed to your chest), and brace your abs as if you were about to get punched in the stomach (the Valsalva maneuver). Flatten your back by pushing your hips up, wedging yourself into what’s essentially a “quarter-squat” position. Pull your shoulder blades “back and down” and push your upper arms into your sides (a good cue for this is to “crush oranges in your armpits”). Step 2: PullSqueeze the bar as hard as you can and pull it straight up. As you pull, think about forcefully thrusting your hips toward the bar and driving your body upward and slightly back, onto your heels. Push through your heels, and keep your elbows locked in place and lower-back slightly arched (no rounding!). Your hips and shoulders should rise simultaneously. Don’t shoot your hips up and then use your back like a lever to raise your shoulders. Try to keep the bar on as vertically straight of a path as possible because any deviations will slow you down and make it harder to maintain good form. The bar shouldn’t move noticeably toward or away from you. At the top, your chest should be up and your shoulders down. Don’t lean back, hyperextend your lower-back, or shrug the weight up. Step 3: DescendWhile keeping your back flat and your core tight, reverse the movement to return the bar to its starting position on the safety arms. This is basically a mirror image of what you did during the pull. Let the bar slide straight down your thighs while letting your hips move backward until the bar reaches the safety arms. Lower the bar quickly but smoothly. The entire descent should take a second or less. Take a moment to get into the proper setup position, then start your next rep. Rack Pulls: Variations1. Smith Machine Rack PullsGenerally speaking, machines such as the Smith machine aren’t as effective as free weights for building muscle. However, if you don’t have access to a squat rack or just want to mix up your training, Smith machine rack pulls are a workable alternative. How to:
2. Above the Knee Rack PullsRack pulls above the knee (also known as “high rack pulls”) are similar to standard rack pulls except you set the safety bars slightly higher (above knee height), which makes the range of motion even shorter. This increases the amount of weight you can lift but decreases the amount of work your lower back has to do, placing most of the load on your traps (which is why some people believe they’re the best rack pulls for traps training). How to:
3. Sumo Rack PullsSumo rack pulls train your legs and glutes more than standard rack pulls because the wider stance puts your back in an even more upright position. This makes them ideal for building the strength you need to complete the “lockout” portion of the standard sumo deadlift. How to:
4. Wide-Grip Rack PullsIf you do rack pulls for traps development, wide-grip rack pulls (or “snatch-grip rack pulls”) are a good option because gripping the bar with a wider grip increases the amount of work the traps have to do. However, it also increases the range of motion of the exercise which reduces how much weight you can use. How to:
5. Isometric Rack PullsIsometric rack pulls are an effective way to train the bottom portion of the deadlift. This means they’re a great exercise for improving your deadlift performance if you struggle to get the bar off the floor. How to:
Rack pulls have a considerably shorter range of motion than the conventional deadlift. This means your legs don’t contribute as much to the lift, and you can rack pull much more weight than you can deadlift. The post Rack Pulls: Benefits, Form & Variations appeared first on Legion Athletics. from https://legionathletics.com/rack-pulls/ |


 RSS Feed
